Adding More Abrasive Entry Points Inside Your Sandblasting Pressure Pot to Avoid Clogging of Abrasive
by David DamicoOne of my projects this summer is to install sandblasting equipment in our garage. I've got the air compressor, pressure pot and blasting cabinet and hope to complete the project soon. This delay has given me time to do more research on the entire process.
The project described below is a result of watching Thomas Kuhn's YouTube video on using a pressure pot.
The basics of sandblasting are illustrated here. The air compressor pushes air to the pressure pot, mixing with the abrasive material, which then is projected to the blasting cabinet. Some details have been left out to simplify the explanation.
There are many possibilities for the glandular abrasive to clog at the base of the pressure pot because the opening is only 3/8" wide. Moisture or the speed of the airflow can cause clumping, stopping the airflow to the nozzle. The pictures below illustrate my effort to eliminate clogging based on Thomas Kuhn's YouTube video
suggesting adding an elongated flute with holes into the bottom of the pressure pot. The multiple holes allow abrasive to get into the line without clogging rather than a single, open hole.
To make a trough for the pipe to lie down in while drilling, I clamped two pieces of scrap wood together and drilled down the middle using a drill bit slightly smaller that the outer dimension (OD) of the pipe.

The image on the right shows the 7" brass flute held onto the trough by Screw Bolt Hose Clamps and a drill press vice. The holes were drilled 1/2" apart, through both walls of the pipe. The pipe was then rotated 90º and alternating holes drilled between the holes already existing. I used a 1/8 bit and cutting oil to cool down the heated metal while drilling. The tip of the bit sometimes slid sideways on the flute so my holes didn't line up perfectly... although they will still work.
When the drill bit comes out the opposing side of the brass flute, there will be some flashing or protrusion of the metal. I used a medium, hand held file to smooth out the flash.
---------------------------------------------------------------------------------------------------------------------
Enlarging the Threaded Pipe Hole
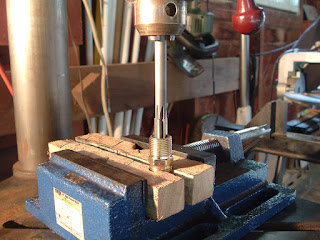
I then clamped another pair of scrap wood pieces and drilled a hole using a spade bit slightly smaller than the diameter of the threaded pipe. I am using wood as a clamp because it is strong enough to hold the threaded pipe needing reaming yet soft enough to not damage the pipe threads.
The threaded pipe has an inner dimension (ID) of almost 3/8" but the brass flute OD is precisely 3/8" so I must ream the threaded pipe. Placing the threaded pipe in the homemade wooden holder, I was easily able to ream an exact 3/8" hole with plenty of cutting oil to keep the metal cool.
To the right is a close up of the reamer in case you've never used one. The Reamer is an easy way of making a precise, smooth walled hole. You must start with a hole that is almost to size. The reamer does not make holes, only enlarges them.
This picture shows the finished project. The brass flue now fits snuggly into the threaded pipe. The thread nearest the flute will screw into the bottom of the pressure pot. I hope this tutorial helps eliminate any abrasive clogging in your pressure pot. Cost was minimal-$13 for the 24", thick walled brass tube and $7 for the reamer, both from Amazon. My pressure pot is a 20 gal. from Harbor Freight.
David Damico


No comments:
Post a Comment